
If you are on the hunt for a cookie recipe that’s as charming to look at as it is delicious to eat, then this Bear Cookies Recipe is just what you need. These delightful little treats combine a soft, chewy texture with a subtle cocoa flavor, all wrapped up in adorable bear-shaped cookies decorated with sweet, colorful chocolate details. Perfect for sharing with friends, gifting, or simply enjoying with a cup of tea, these Bear Cookies are sure to bring a smile and warm feelings to everyone lucky enough to bite into one.
Ingredients You’ll Need
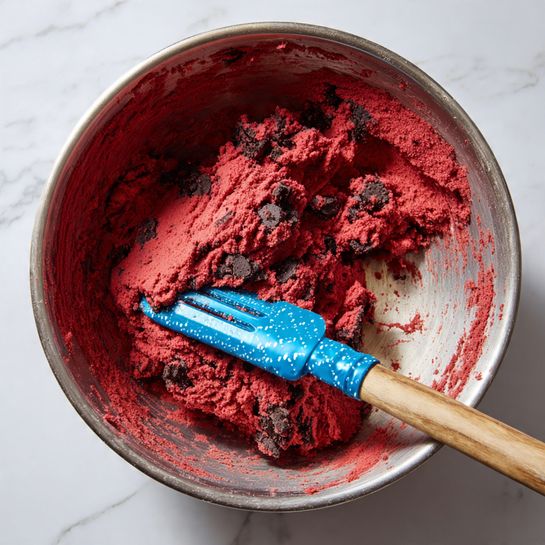
The magic behind any great recipe lies in the ingredients, and this Bear Cookies Recipe is no exception. Each component plays an essential role, whether it’s adding flavor, texture, or that perfect color to bring these bears to life.
- All-purpose flour (1 ½ cup): The base that gives your cookies structure and tenderness when spooned and leveled carefully.
- Cocoa powder (2 tbsp, sifted): Provides a rich chocolate undertone that balances the sweet elements beautifully.
- Baking soda (½ tsp) & baking powder (½ tsp): Both work together to give your cookies just the right lift and chew.
- Salt (½ tsp): A small pinch that enhances all the other flavors in the cookie dough.
- Unsalted butter (½ cup, melted and cooled): Adds moisture and helps create that melt-in-your-mouth texture.
- Granulated sugar (¼ cup): Sweetens the dough with a classic sugar crunch.
- Light or dark brown sugar (¼ cup, packed): Brings a subtle caramel note and extra chew.
- Vanilla extract (1 tsp): Adds warmth and depth to every bite.
- White vinegar (1 tsp): A secret ingredient that reacts with baking soda for extra softness.
- Egg (1): Binds everything together to form the perfect dough.
- Red food coloring: Gives your bear dough that lovely rosy color to make them irresistibly cute.
- Melted milk or dark chocolate (1 tbsp): For decorating the bears’ eyes and noses with precision.
- Melted white chocolate (3 tbsp): Used to highlight ears and snouts with creamy sweetness.
- Oil-based food coloring (pink/red): Essential to tint white chocolate smoothly without seizing.
How to Make Bear Cookies Recipe
Step 1: Mix the Dry Ingredients
Begin by whisking together the all-purpose flour, cocoa powder, baking soda, baking powder, and salt in a medium bowl. This step ensures all the dry ingredients are evenly distributed so each cookie will bake beautifully with just the right flavor and texture.
Step 2: Cream Butter and Sugars
Using a stand mixer fitted with the paddle attachment, beat the melted and cooled butter with both granulated and brown sugars on medium speed until everything is well combined and smooth. Scrape down the sides to make sure there are no hidden sugar pockets.
Step 3: Add Wet Ingredients
Next, mix in the vanilla extract, white vinegar, egg, and red food coloring. These wet ingredients not only add flavor but also give the dough an irresistibly red hue that brings the bears to life. Mix everything until the dough is perfectly smooth and vibrant in color.
Step 4: Combine Dry and Wet Ingredients
Pour all the dry ingredients into the wet mixture and gently fold together until just combined. If you want a deeper red, add a little more food coloring as needed. Cover the dough, then chill it in the fridge for 20 to 30 minutes. This resting time helps hydrate the flour and lets the butter firm up again, which means your cookies will be chewier and easier to shape.
Step 5: Shape the Cookies
Preheat your oven to 325°F (163°C) and line two baking sheets with parchment paper or silicone mats. Use a small cookie scoop to portion about 1 ½ tablespoons of dough per cookie and roll them into balls, spacing each about 3 inches apart on the trays. For the bear ears, take about 1 teaspoon of dough, split it in half, and roll into two small balls to place on top of each cookie’s head.
Step 6: Bake to Perfection
Bake the cookies for 9 to 11 minutes until the edges are set but the centers remain slightly puffy. For the chewiest texture, slightly underbake rather than overbake. Once done, let the cookies cool on the baking tray for 5 to 10 minutes before transferring them to a wire rack to cool completely.
Step 7: Decorate the Bear Faces
When the cookies are cool, it’s time to bring out their lovable bear expressions. Use a piping bag or a toothpick to paint on details. Melt white chocolate and tint a portion pink or red with oil-based food coloring to add blush to the snouts and ears. The oil-based coloring keeps the chocolate smooth and prevents it from seizing. Use melted milk or dark chocolate to carefully add eyes and noses, giving each bear its own unique personality.
How to Serve Bear Cookies Recipe
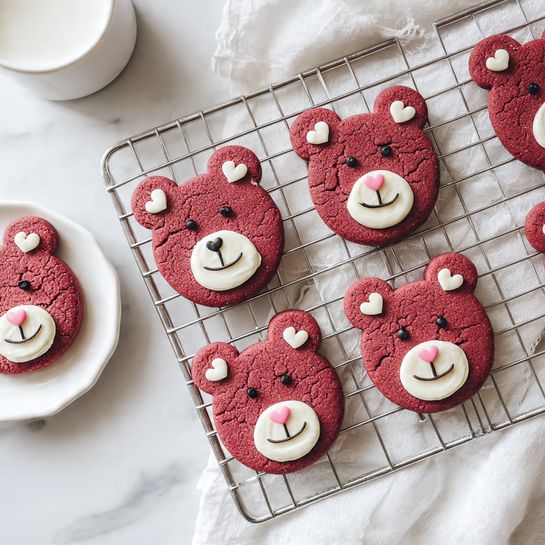
Garnishes
A simple dusting of powdered sugar or a light drizzle of extra melted chocolate can enhance these Bear Cookies without overpowering their charming look. Adding tiny sprinkles or edible glitter to the cheeks can also give your bears a whimsical glow perfect for parties or holidays.
Side Dishes
These cookies pair wonderfully with a cozy glass of cold milk, a steaming cup of hot cocoa, or your favorite tea. For a more festive spread, serve alongside fresh fruit slices or whipped cream for an extra touch of indulgence and balance.
Creative Ways to Present
If you’re looking to wow your guests, try arranging your Bear Cookies on a woodland-themed platter with little edible leaves or nuts around them. You can also package them in cute cellophane bags tied with a ribbon for gifts that melt hearts. Displaying them on mini cake stands adds an elegant yet playful vibe to any dessert table.
Make Ahead and Storage
Storing Leftovers
To keep your Bear Cookies fresh, store them in an airtight container at room temperature. They will stay soft and chewy for up to 4 days, perfect for enjoying a little treat each day.
Freezing
If you want to make your Bear Cookies Recipe ahead of time, freezing is a wonderful option. Freeze the baked and cooled cookies between layers of parchment paper inside a sealed container or freezer bag. They will keep well for up to 3 months.
Reheating
To enjoy your frozen Bear Cookies at their best, thaw them at room temperature for about 30 minutes. If you prefer them warm, gently heat in a microwave for 10 to 15 seconds or pop them in a low-temperature oven for a few minutes to revive the softness and bring out that melt-in-your-mouth goodness.
FAQs
Can I make Bear Cookies without food coloring?
Absolutely! While food coloring helps create the signature rosy bear look, you can skip it for a more natural chocolate cookie. The cookies will still be delicious, just without the pink hue.
What type of chocolate is best for decorating?
Melted white chocolate works beautifully for snouts and ears, especially when tinted with oil-based coloring to keep its smooth texture. Milk or dark chocolate is perfect for creating the eyes and noses thanks to its rich color and easy melting properties.
Why add vinegar to cookie dough?
The vinegar reacts with baking soda to create tiny bubbles in the dough, which leads to softer, fluffier cookies with a tender crumb — a neat little trick that makes a big difference!
Can I use a hand mixer instead of a stand mixer for this Bear Cookies Recipe?
Yes! You can easily use a hand mixer or even whisk the ingredients by hand. Just make sure your melted butter has cooled and mix the dough until everything is combined well.
How do I prevent white chocolate from seizing when adding coloring?
Use oil-based food coloring specifically for chocolate, as water-based colors cause it to seize. If your chocolate thickens, stir in a teaspoon of a neutral oil like canola or vegetable oil gradually until the smooth consistency returns.
Final Thoughts
This Bear Cookies Recipe is a joyful way to add a little whimsy and lots of flavor to your baking routine. It’s easy to prepare, visually delightful, and perfect for any occasion where smiles and sweet treats are welcome. So grab your mixing bowl and get ready to bake up some cuddly, chocolatey bears that everyone will adore!
Print
Bear Cookies Recipe
These adorable Bear Cookies combine rich cocoa flavor with a chewy texture and delightful bear face designs made with melted chocolates. Perfect for a fun baking project and an irresistible treat for kids and adults alike.
- Total Time: 1 hour 1 minute
- Yield: 16 servings
Ingredients
Dry Ingredients
- 1 ½ cup all-purpose flour, spooned and leveled
- 2 tbsp cocoa powder, sifted
- ½ tsp baking soda
- ½ tsp baking powder
- ½ tsp salt
Wet Ingredients
- ½ cup unsalted butter, melted and cooled
- ¼ cup granulated sugar
- ¼ cup light or dark brown sugar, packed
- 1 tsp vanilla extract
- 1 tsp white vinegar
- 1 egg
- red food coloring
Decorations
- 1 tbsp melted milk or dark chocolate
- 3 tbsp melted white chocolate
- oil-based food coloring (pink/red) for tinting white chocolate
Instructions
- Mix dry ingredients: In a medium bowl, whisk together the flour, cocoa powder, baking powder, baking soda, and salt until evenly combined.
- Combine wet ingredients: In a stand mixer fitted with a paddle attachment (or using a hand mixer or whisk), beat the melted butter, granulated sugar, and brown sugar on medium speed until combined. Scrape down the bowl sides.
- Add flavorings and egg: Mix in vanilla extract, white vinegar, egg, and red food coloring until the mixture is smooth and uniform in color.
- Add dry ingredients to wet: Gradually add the dry ingredient mixture to the wet ingredients and stir until fully incorporated. Add more red food coloring if a deeper color is desired. Cover the dough and chill in the refrigerator for 20-30 minutes to hydrate the flour and firm the butter, resulting in chewier cookies and easier handling.
- Preheat oven and prepare trays: Heat the oven to 325°F (163°C) and line two baking sheets with parchment paper or silicone baking mats.
- Shape cookies: Using a small cookie scoop (about 1 ½ tablespoons), form dough balls and place them 3 inches apart on the prepared trays. Set aside some smaller portions (about 1 teaspoon each) to form the ears by rolling into small balls and placing on top of the head section of each bear cookie.
- Bake: Bake for 9-11 minutes until edges are set and centers are slightly puffy. Slightly underbaking will produce chewier cookies.
- Cool: Allow cookies to cool on the baking tray for 5-10 minutes before transferring to a wire rack to cool completely.
- Add bear faces: Use a piping bag, toothpick, or cookie scribe to decorate. Melt white chocolate and tint with oil-based pink or red food coloring to draw snouts, ears, and blush on cheeks. Stir in a teaspoon of neutral oil if chocolate seizes.
- Finish decorations: Use melted milk or dark chocolate to pipe on eyes and noses.
- Serve and enjoy: Allow the decorated chocolate to set, then enjoy your charming Bear Cookies!
Notes
- Chilling the dough helps develop chewier cookies and makes the dough easier to handle.
- Use oil-based food coloring for melting chocolate to prevent seizing; if seizing occurs, add a little neutral oil to smooth it out.
- Underbaking slightly will give a chewier texture to the cookies.
- Spacing cookies about 3 inches apart prevents them from spreading into each other.
- The vinegar reacts with baking soda to help leaven the cookies and tenderize the texture.
- Prep Time: 20 minutes
- Cook Time: 11 minutes
- Category: Dessert
- Method: Baking
- Cuisine: American


